Working with ARKit on Room Scanning
Ever since I saw the announcement of ARKit, I’ve been waiting for an opportunity to try it out. It was a good opportunity to return to the prototype from two years ago. From the announcements and WWDC talks ARKit looked promising: the accuracy of it, real-time rendering performance and ease of implementation. It was time to test it.
Another reason to return to measuring rooms is that the motion sensors themselves were updated. Starting from iPhone 5S the sensors data is collected and processed using a separate co-processor. Since 2013, every year the chip is updated and the newest one called M11 was introduced in iPhone 8, 8 Plus and X. In theory, the results should be the most accurate on these three devices.
ARKit's Capabilities
In case of measuring the most significant help we get from ARKit, is the placement of the device in space. Using a camera image and motion sensors it can determine the phone’s position, orientation and distance to some objects and surfaces.

There is no need for complicated and error-prone code to calculate a movement of the device from the raw data that the sensors provide. Apple does it all for us. The only hard part is how we use it. I tried few approaches to find the most accurate one. Let me walk you through my process.
First Attempt at ARKit-Based Room Scan
In my first attempt, I simply tried to remake the app from two years ago — measuring a distance between the walls by getting a position on the phone when it’s touching the wall. The difference was that instead of calculating the distance with a self-written code I used the data from ARKit. Simply put, it didn’t work. ARKit uses a camera image to help determine the position of the phone in space, and when the phone is touching the wall the camera is obscured. Without the camera, the data is not reliable enough to be used.
Further Experimentation with ARKit
Next approach was based on a different ARKit component — hit testing by intersecting the nearest feature point. ARKit has an ability to find the surfaces and contours of objects by detecting notable features in the camera image.
In theory, using the hit testing with enabled detecting feature points could allow measuring the distance from the phone to the object the camera is pointing at. A user would stand in the center of a room and point the phone’s camera at a wall. Data from ARKit would be used to determine the wall position in the 3D space. The orientation of the device would be used to get the wall’s orientation.
Unfortunately, it doesn’t work well for walls as most walls don’t have notable features and are plain, one-colored surfaces.
Fixing ARKit Measurement Issues
To fix the issues from the previous approach the point of measurement has to change. There are at least two options to consider.
First one is printing a certain pattern that could be recognized by the app and used as a feature point. The print would have to be for example taped to the wall so the app would recognize it instead of trying to find a plain wall in the image. It probably would work but it would be very inconvenient for the user, therefore the idea was not implemented.
The second option is using a different type of hit testing provided by ARKit. It’s based on the detection of the horizontal planes. When initializing AR world tracking we can enable horizontal plane detection. With this option enabled ARKit constantly looks for horizontal surfaces that can be used as anchors for the tracking. Alright, so we can detect the horizontal plane, but what does it have to do with finding a wall which obviously is a vertical surface?
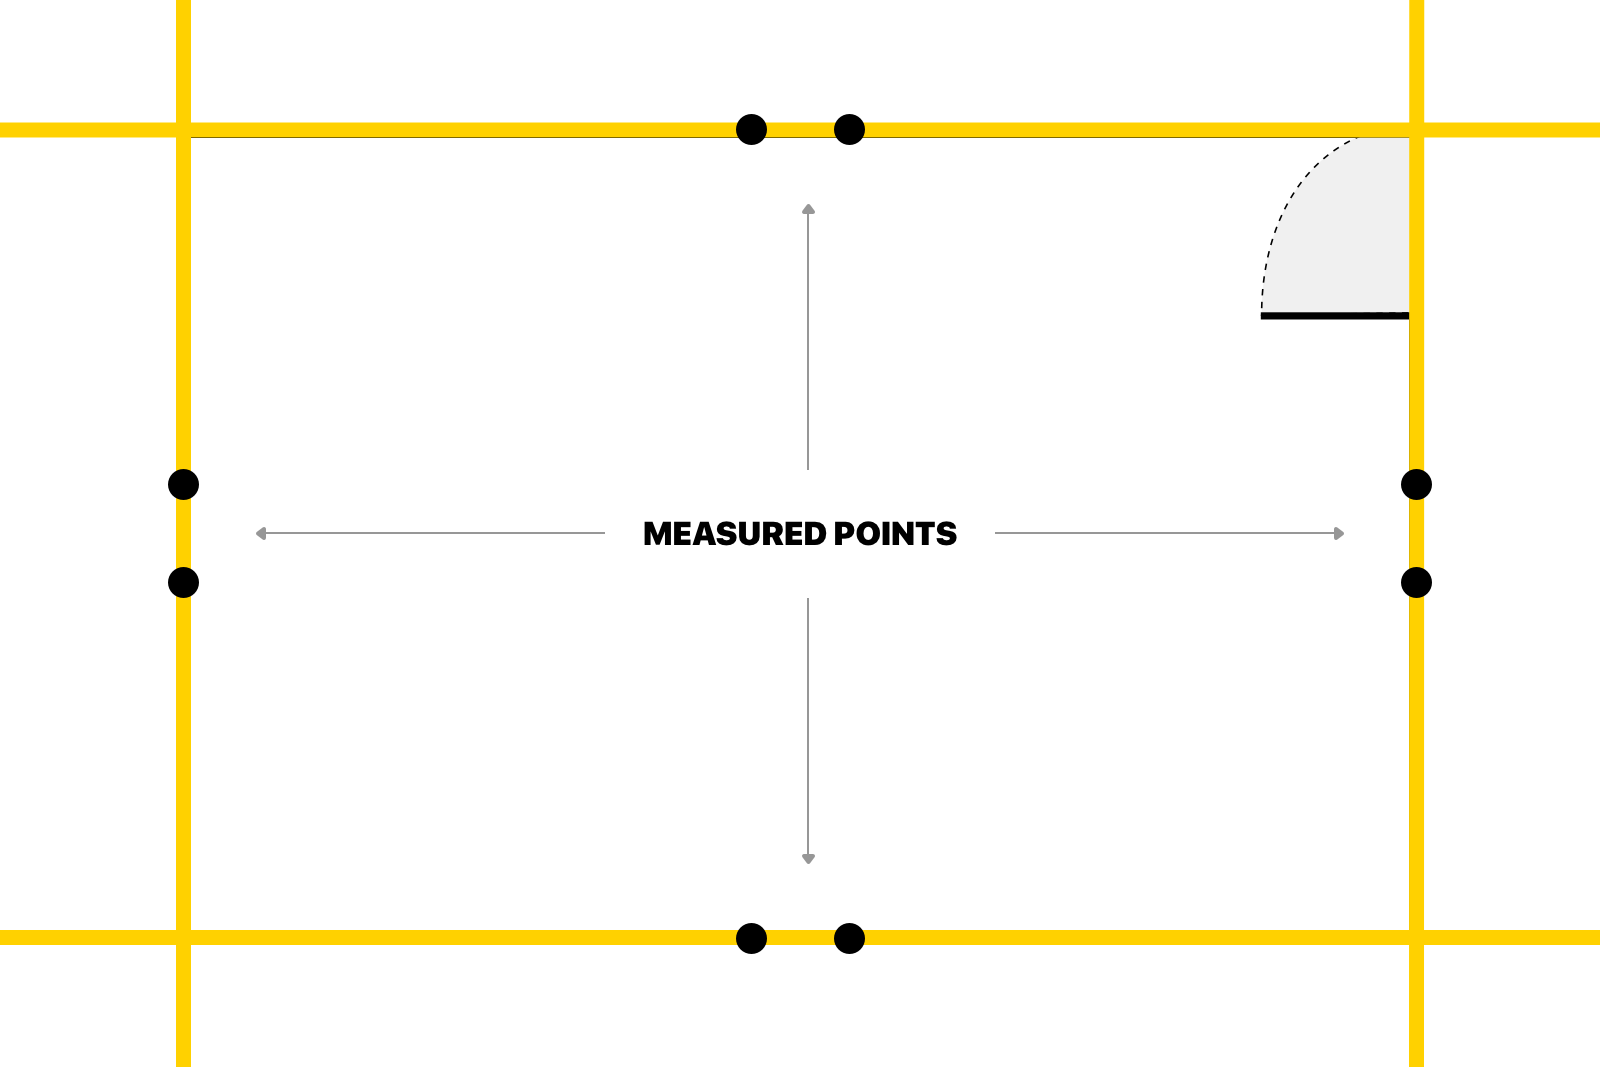
Well, as we don’t need the wall’s height we can measure its position by hit testing a floor in the place where it connects with the wall.
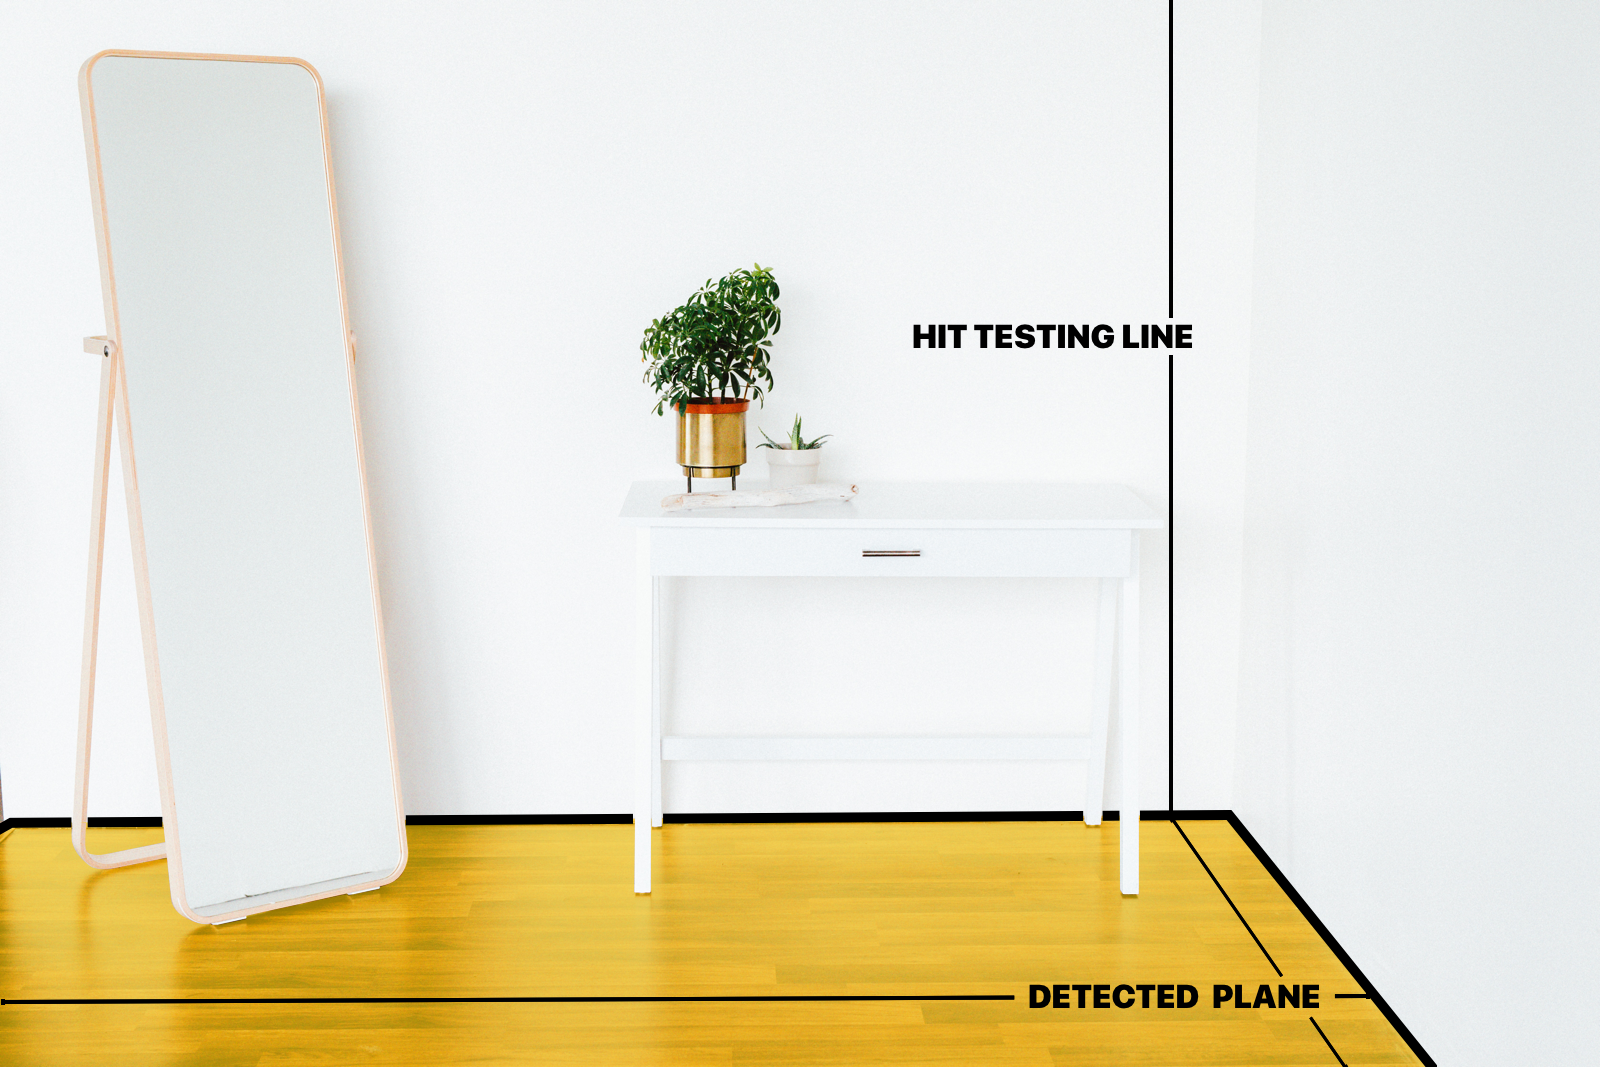
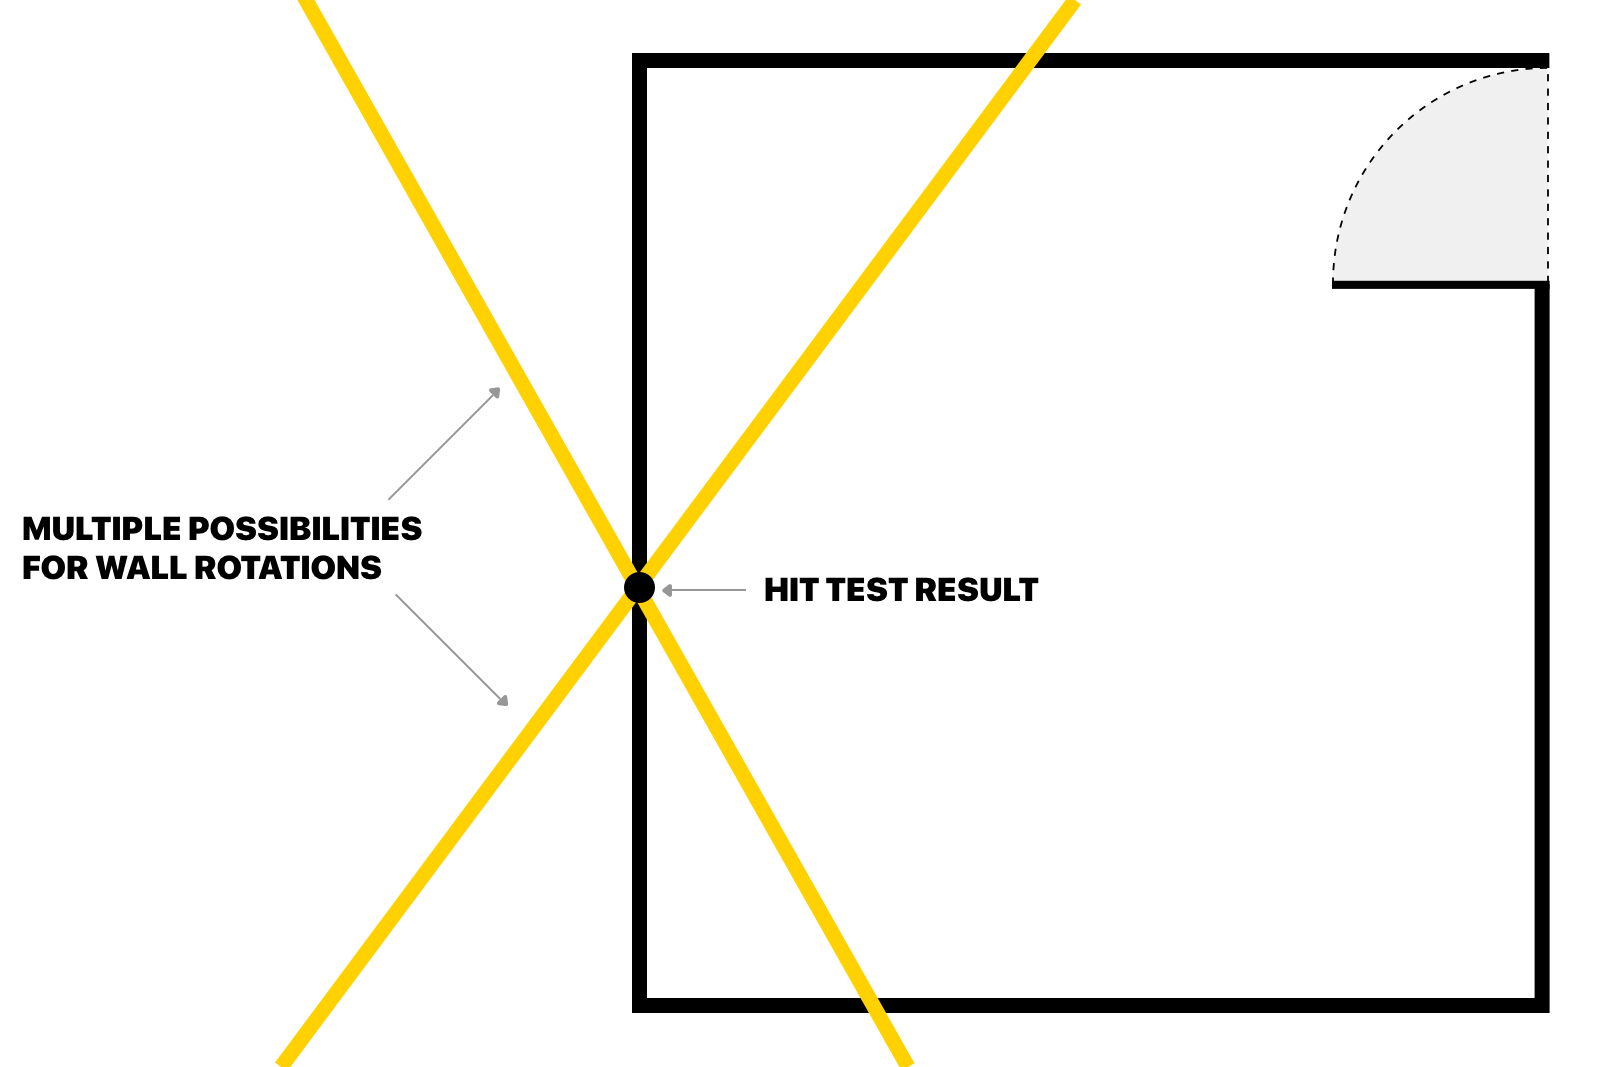
As in the approach with feature points, the wall’s orientation is determined from the phone’s orientation. This time the distance accuracy is satisfactory, with a good lighting we can get a usable measurement of a single wall’s position. There is a problem when measuring multiple walls to draw a room plan. The detected orientation of the wall depends on the user to hold the phone parallel to the wall. Rarely the same angle is held between the wall and the phone across all measurements which leads to decreasing accuracy in both wall’s length and room’s shape.
Improvements with Further Iterations
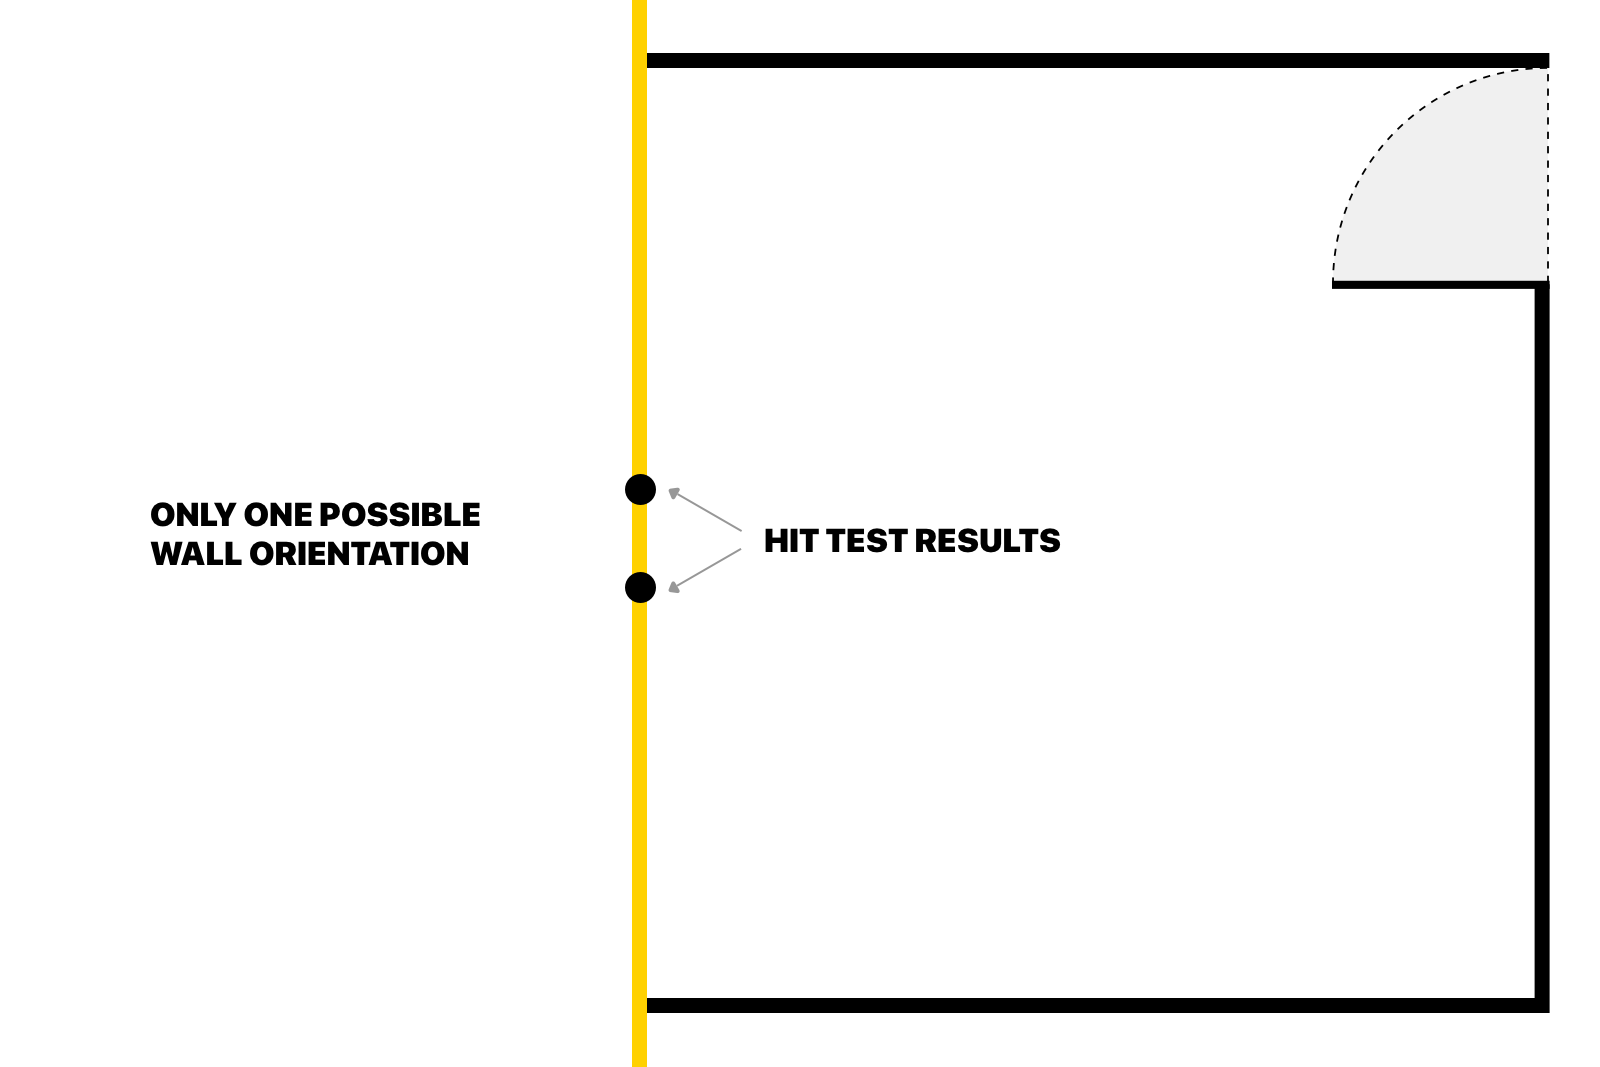
Final iteration improves on the previous one. This time, to fix the angle issue, the app hit-tests the connection between a floor and a wall in two places at once. When we have two points we don’t need to get the phone’s orientation as we can draw the line, representing the wall, that passes through those two points. In reality, to determine the plane we need three points but in this case, we assume that the wall is always perpendicular to the floor.
Drawing the Room Plan with ARKit
With all the measurements ready, it’s time to draw a plan. In this step, we have to figure out how to draw a plan of a room using two 3D points per wall.
First, we transform the 3D point to 2D by removing height value as it’s not needed. Then, for each pair of points, we define a line that represents an infinite wall.
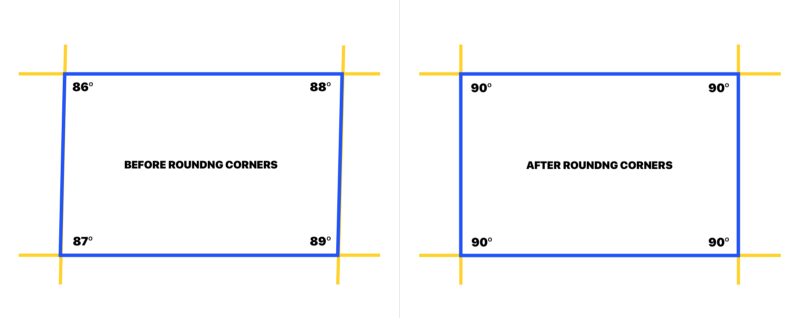
When we have the infinite lines, we can determine intersection points between those lines which are representing a room corner.

When all lines are drawn and cut we get the room plan. Unfortunately, even with two measurement points per wall, there are still inaccuracies in the angles between the walls. Those inaccuracies affect the intersection points, which causes the walls that are the same length to differ. To improve the results I added another step that is executed before the drawing — rounding angles. After testing the app with various rooms, rounding the angles to 10 degrees gave the best outcome.
Always Going for Improvement and Accuracy
To determine the accuracy of the measurements I tested it with multiple rooms and lighting conditions.
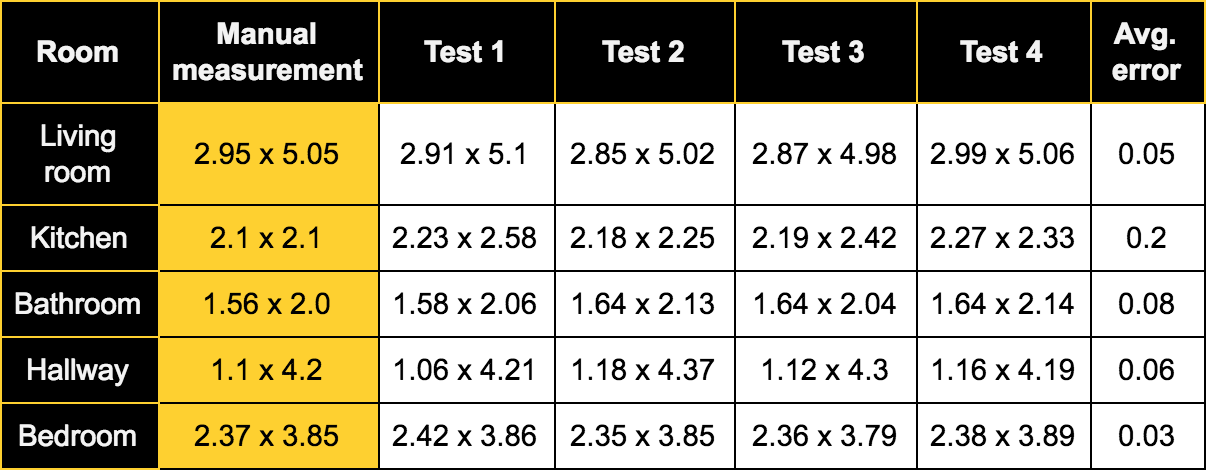
The presented results are based on comparing wall length measured manually to the results received using the app. As we can see the accuracy is 3–20 cm (1–8 inches) with an average of 8.5 cm (3.3 inches). It’s definitely an improvement over the accuracy of the app from two years ago which was
20–40 cm (8–16 inches). Worth noting is most of the measurements have an error below 10 cm (4 inches).
The measurements of the kitchen are the least accurate. The cause is that the kitchen walls are not visible directly at the floor level due to cabinets. In this case, during the measurement, I had to guess where the wall would touch the floor.
Room-Scanning PoC App
The app I created is just a proof of concept and probably wouldn’t work for some of the room shapes but it can be a base for more advanced applications. There is a lot of room for improvement, e.g. more advanced angle calculations, easier to use measuring indicator. I’m already happy with the results that I got and I’m looking forward to ARKit updates that might make it even more reliable.
So, the question is:
‘’Are the new sensors and help from ARKit enough to give a noticeable boost to the measurement accuracy? ‘’
In my opinion, YES. Comparing to the attempt from 2 years ago, with less time required we get more reliable and precise results.
UPDATE: Apple's LiDAR technology has revolutionized the area of room scanning. Now laser beams from Apple's LiDAR seamlessly recognize depth and angles, feeding the data into an application.

Related articles
Supporting companies in becoming category leaders. We deliver full-cycle solutions for businesses of all sizes.
.png)